SAML single sign-on (SSO)
SAML single sign-on requires an Enterprise subscription.
SAML (Security Assertion Markup Language) is a standard authentication and authorisation system. You can connect your existing identity provider to Flagsmith using SAML 2.0, which lets your users log in to your Flagsmith organisation using their existing credentials.
SAML single sign-on also lets Flagsmith use the existing user groups from your identity provider. This lets you assign permissions to your Flagsmith users directly from their identity provider groups, and not have to manage group membership from Flagsmith.
Prerequisites
- Your Flagsmith organisation must have an active Enterprise licence.
User Matching and Organisation Membership
If you have preexisting Flagsmith users that use other authentication methods such as email and password, GitHub or Google, and you later set up SSO for these users, Flagsmith will see them as the same user as long as their email is the same (case-insensitive). All Flagsmith data including permissions are preserved as long as the email addresses match between SSO and non-SSO users.
Users that log in using SSO can only belong to one Flagsmith organisation. If a user tries to log in with SSO, and they belong to more than one Flagsmith organisation, they will not be able to log in using SSO until they are removed from all other organisations. These users can still log in using a non-SSO method and remove themselves from the other organisations if they choose.
Self-Hosting Requirements
If you are self-hosting Flagsmith, TLS is required. Encrypted SAML assertions are not supported.
Setup SAML
If your identity provider is Okta, use the Flagsmith Okta application instead of following these steps.
This is an overview of the steps required to configure SAML SSO:
- Create a Flagsmith SAML configuration.
- Add your identity provider's SAML metadata to this Flagsmith SAML configuration.
- Add your Flagsmith SAML configuration's service provider metadata to your identity provider.
- Optional: Add external IDs to your Flagsmith groups to map your identity provider groups to Flagsmith groups.
You can manage your Flagsmith SAML configurations from the Flagsmith dashboard. Click on your Flagsmith organisation name in the top left, then go to Organisation Settings > SAML.
SAML Configuration Options
You can create multiple SAML configurations if you have multiple identity providers. In most cases, you will only need one.
When creating a SAML configuration, the following options are available:
Name: (required) A unique, URL-friendly name for the SAML configuration. This name must be unique across all Flagsmith organisations and forms part of the URL that your identity provider will post SAML messages to during authentication. Users must type this name when clicking "Single Sign-On" at the login screen. It cannot be changed after the SAML configuration is created.
Allow IdP-initiated: If enabled, users will be able to log in directly from your identity provider without needing to visit the Flagsmith login page.
IdP metadata XML: The SAML metadata from your identity provider. This typically includes information such as your identity provider's public key for SAML assertions. If you do not have this metadata yet, you can create the SAML configuration without it and come back to this step later.
Once your Flagsmith SAML configuration is created, you can download its SAML metadata by clicking "Download Service Provider Metadata". Add this file to your identity provider to establish a trust relationship between it and Flagsmith.
Additional options when self-hosting Flagsmith
Frontend URL should point to the base URL of the Flagsmith dashboard. It is automatically prefilled with the URL of the dashboard you are currently using. You only need to change this if your users will access the Flagsmith dashboard using a different URL than the one you are currently using—for example, if you are connecting to Flagsmith via port forwarding or a VPN that your users do not typically use.
Assertion consumer service URL
Each Flagsmith SAML configuration has its own Assertion Consumer Service (ACS) URL, also known as single sign-on URL. Your identity provider will post SAML messages to this URL when a user logs in using SSO. The ACS URL for any SAML configuration is as follows, replacing flagsmith.example.com with your Flagsmith API's domain:
https://flagsmith.example.com/api/v1/auth/saml/YOUR_SAML_CONFIGURATION_NAME/response/
Attribute mapping
Flagsmith will look for the following SAML attributes, in order, to uniquely identify a SAML user:
subject-iduidNameID
Flagsmith also maps user attributes from the following claims in the SAML assertion:
| Flagsmith attribute | Identity provider claim names |
|---|---|
mail, email or emailAddress | |
| First name | gn, givenName or the first part of displayName |
| Last name | sn, surname or the second part of displayName |
| Groups | groups |
To add custom attribute mappings, edit your SAML configuration and open the Attribute Mappings tab. For example,
this mapping tells Flagsmith to look for user groups in a claim other than the default groups claim:

Permissions for SAML users
By default, users logging in via SAML will have no permissions to view or modify anything in the Flagsmith dashboard. You can customise this by creating a group with the "Add new users by default" option enabled, and assigning your desired default permissions to that group.
Using groups from your identity provider
Flagsmith can add or remove a user from groups based on your identity provider's SAML response when logging in.
When a user logs in, Flagsmith will make them a member of all the groups listed in the groups claim from your identity provider's SAML assertion. Each value of the groups claim should correspond to the "External ID" of a Flagsmith group:
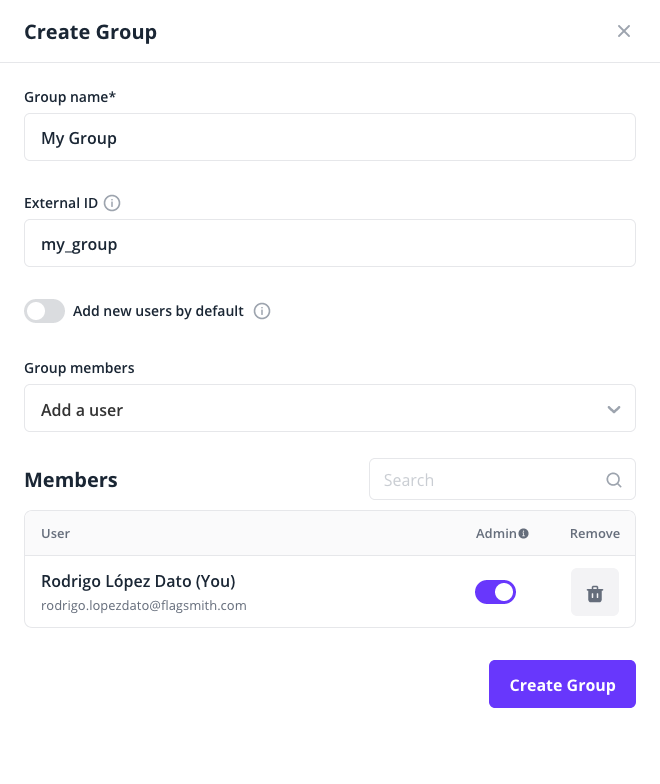
For example, a SAML assertion with the following groups claim would assign the user to the Flagsmith groups with external IDs of my_group and my_other_group:
<saml2:Attribute Name="groups">
  <saml2:AttributeValue xmlns:xs="http://www.w3.org/2001/XMLSchema" xmlns:xsi="http://www.w3.org/2001/XMLSchema-instance" xsi:type="xs:anyType">
        my_group
    </saml2:AttributeValue>
  <saml2:AttributeValue xmlns:xs="http://www.w3.org/2001/XMLSchema" xmlns:xsi="http://www.w3.org/2001/XMLSchema-instance" xsi:type="xs:anyType">
        my_other_group
    </saml2:AttributeValue>
</saml2:Attribute>
By default, this claim must be named exactly groups. Some identity providers such as Microsoft Entra ID add a namespace to their claims such as http://schemas.microsoft.com/ws/2008/06/identity/claims/groups. If this is the case, or your groups claim has a different name, you must tell Flagsmith which claim it should look at by creating an attribute mapping.
Force users to log in with SSO
Once you have confirmed your SAML configuration is working, you can prevent users logging in using other authentication methods with any of these options:
- Restrict authentication methods per email domain.
- If you have a private Flagsmith instance, disable password authentication.
Always use a specific SAML configuration
When a user clicks on "Single Sign-On" at the Flagsmith login screen, they will be prompted to enter the name of a SAML configuration. If you are self-hosting Flagsmith, you can skip this step and always use a specific SAML configuration by setting up the sso_idp Flagsmith-on-Flagsmith flag. The text value of this flag should be the name of the SAML configuration to use.
If you are using Flagsmith private cloud, contact Flagsmith support once you have created your SAML configuration and validated it works correctly.
Canonicalization methods
Some identity providers require the service provider to support canonicalization methods that are not allowed by default. You can see the methods that are enabled by default here.
You can enable additional canonicalization methods by setting the EXTRA_ALLOWED_CANONICALIZATIONS environment variable to a comma-separated list of canonicalization method URIs. For example:
EXTRA_ALLOWED_CANONICALIZATIONS=http://www.w3.org/TR/2001/REC-xml-c14n-20010315#,http://www.w3.org/TR/2001/REC-xml-c14n-20010315#WithComments
Force SSL after authentication
You can configure Flagsmith to ignore the X-Forwarded-Proto HTTP header and always use HTTPS for the ACS URL by setting the SAML_FORCE_SSL environment variable to True.
Troubleshooting
If you need to contact Flagsmith support or an administrator for help with SSO logins, the best way is to record and share a HAR file from your web browser where you try to log in to Flagsmith using your SAML identity provider.